Playing Through a Trilogy
- Matt Evans

- Jan 13
- 12 min read
Written by Kyle Mueller
To spend Christmas Break, I created a couple of Star Wars legion game scenarios following the plot of the movies. We called this a “Star Wars Legion Marathon”, and played 4 games spanning over the 3 episodes of the Original Trilogy on my Tatooine, Hoth, Bespin and Endor boards. When a side wins one game, they will gain benefits that lead into the next game. I took over as the Dark Side, while my dad played as the Rebel Alliance.
Game 1-Boarding the Millenium Falcon on Docking Bay 94:
As Luke Skywalker hires Han Solo to be taxied to Alderaan, they are stopped by the Hutt Cartel and the Empire. The Empire is searching for the missing Death Star Plans and has pinpointed the droids they’re looking for, while the Hutts prepare to collect their death mark on Han Solo.
HOW TO PLAY (At the end of the game, person with most points wins)
Both:
Defeat a unit: +1
Empire:
Per named rebel unit that doesn’t board falcon (Luke, Han, Chewie, R2) (+1)
Per named character Defeated (+1)
Greedo or Hutts kill Han Solo (+1)
Imperial unit ends the game in melee with R2D2 (+1)
Rebels:
Han Solo Kills Greedo (+1)
Per each named rebel unit that boards falcon (Luke, Han, Chewie, R2) (+2)
Per Hutt Cartel Hitmen squads or named enemy character defeated (+1)
SPECIAL RULES:
Greedo as Cad Bane Proxy
No Bounty or Secret Mission
Swoop bikes allowed in Empire as Hutt Cartel Hitmen (must have 2)
When a named rebel unit ends their activation within half range of the Millenium Falcon POI, they are removed from the game and have “boarded the falcon”

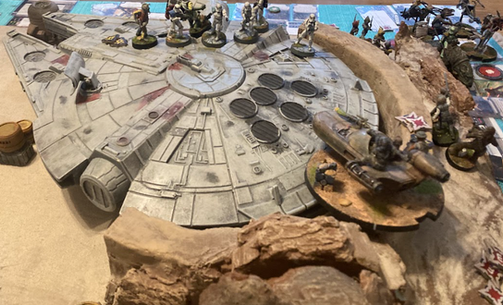
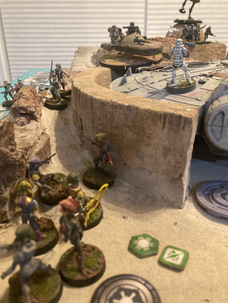
The goal of this game was for the rebel heroes to board the millennium falcon before taking off to Alderaan. The setup of the game looked a little bit like the old version of Breakthrough, except more skirmish sized. Also, instead of both teams switching sides, the rebels had to get to the Falcon’s POI Token slightly outside of the Imperial deployment zone, while the Imperials simply had to stop them.

The game started off with the Rebels having a pretty big lead. The Rebels having Scout 2 on every trooper unit was huge, and allowed for them to walk up and take some early plink shots (and Agile 1 didn’t help my imperials when it came to returning fire). I wasn’t anticipating the rebel’s aggressive deployment, and brought up my Hutt Cartel Swoop Bikes a little too far forward. It didn’t take long before they got blown off the board by a very aggressive X-34 Landspeeder.

Imperial Units were taking very heavy losses, and the game seemed pretty much over, until I played Bossk’s “Reptilian Rampage” followed by Greedo/Cad Bane’s “I’m Your Worst Nightmare”. This combination of command cards allowed Greedo to eliminate Han Solo and Chewbacca, which gained a lot of valuable points. Also, Greedo was able to immobilize Luke Skywalker and prevent him from boarding the Millenium Falcon. Despite this, the rebels had eliminated a lot of activations, which caught up in the end.

When it came to scoring, my rebels killed more units overall, but I was able to squeak in a few points via my Greedo killstreak, while also preventing any of his units from boarding the Falcon. At the end of the game, my Greedo and Bossk were both shot off the board. We ended up tying on points 12-12 (this is not using Legion’s new system of progressive scoring), and rebels won in the tiebreaker. Because the rebellion won this match, they gained the following advantage for the next game:
“During any round of the next game, play Leia’s 1 pip in addition to another command card. You may select 7 command cards when building a command card hand for the next game (3 one-pips)”
Game 2-Walker Assault During Battle of Hoth:
During the Battle of Hoth, rebel units fight to destroy an ATAT before it gets in range and blows up their Shield Generator.
HOW TO PLAY:
6 rounds
Rounds 1, 3, and 5 are about Contesting a Select POI token “transmitter”. If the rebels control the select POI at the end of the round, they may perform attacks against the ATAT in the following round
The ATAT has Armor 10, Red Saves without surge block, and 12 health
At the end of each round, the ATAT may perform a speed 1 move forward and then attack with 3 white, 3 black and 3 red at range 4. Suppressive, Impact 4, no surge to hit. Fixed: Front. The ATAT must perform attacks against non-commander or operative units, if able.
If the ATAT is defeated before the end of the game, the rebels win. If not, empire wins
SPECIAL RULES:
Rebel trooper units gain Prepared Positions
All Imperials gain Scout 3. All Imperial trooper units gain Reinforcements
Use the old “Long March” deployment
When the snowspeeder is defeated, perform a speed 3 move with it and replace the snowspeeder miniature with Luke Skywalker. He gains 1 immobilized token and 2 suppression, and is assigned a facedown order token. He is added to your army’s ranks. You may swap up to 2 command cards in your hand with Luke Skywalker command cards.
The snowspeeder may choose to attack the ATAT with its tow cable. If it damages the ATAT and completes 2 circles around the ATAT, the rebels automatically win
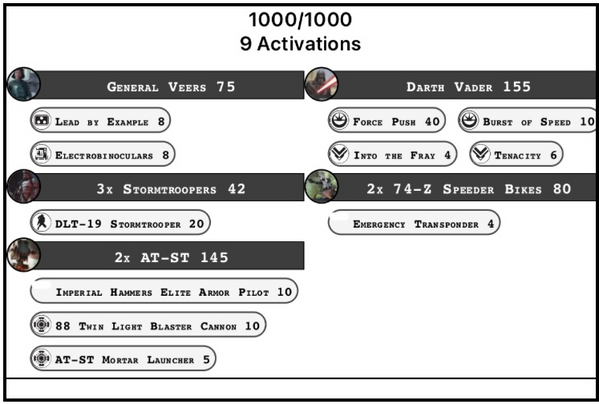
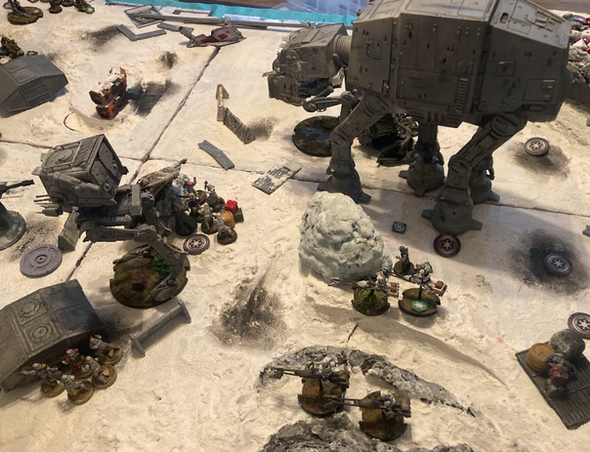
In this game, the rebels had to take out the ATAT walker before the end of the match. This was heavily inspired by EA’s Star Wars Battlefront game mode. We did our best to match the theme of the movies in our army building. My dad was using Leia for support and Chewbacca for some long range protection and offense. Meanwhile, I was fielding General Veers, Darth Vader and two ATSTs. Since we started off with the old Long March Deployment, it took a while before our units began to clash (but that’s okay, it made for some pretty awesome photos), but Scout 3 helped my army catch up and meet his rebels (who all started with Prepared Positions) head on.

The rebels were able to claim the first POI round 1, and could attack the walker in the next round. However, the walker was still on approach, and the long range weaponry could only deal a single wound to the vehicle. Meanwhile, I was suppressing his units with the ATST mortar launcher and flanking his exposed rebel squads with my speeder bikes.

Starting round 3, I began to use my firepower to intentionally target his anti-vehicle units. I managed to severely limit his rebel trooper MPL Ion squads, and take out his FD turret; however, there was some return fire. Before they got taken out, an MPL Ion squad dealt 5 wounds to one of my ATSTs. At the end of the round, the rebels had easily taken the second POI token, and were clear to attack my walker.

During round 4, I knew I had to protect the walker, so I decided to dive in with Vader as a distraction. I played “Impacable” as my command card and drove him into rebel lines, taking out Chewbacca and force pushing his other units into melee or exposed positions. Because of this, I diverted enough action economy to prevent my ATAT from getting shot off the board, however it was at half health.
We ended up calling the game there, as the last “transmission point” POI was surrounded by my troops, and so there wouldn’t be any other way for him to take out my walker. This game had a lot more similarities to the movies than the previous, and since I won, I got the following benefit for our next game, set on Bespin:
The Imperials may “hire” a squad of Pike Syndicates with the Capo and Electro Whip soldier to their ranks in the next game, in addition to their finalized army.
Empire Strikes Back (P2):
Han Solo is frozen in carbonite, but has been misplaced. Both the rebels and Empire fight to recover him. Two IG series assassin droids begin to malfunction and join the battle.
HOW TO PLAY (At the end of the game, person with most points wins)
Neutral:
By round, control the POI at the end of rounds 2, 3 or 4 (+2)
Control the POI at the end of round 5 (+4)
Defeat the opposing IG series assassin droid (+1)
Per unit defeated with your IG Series assassin droid (+1)
Empire:
End the game with Luke Skywalker on 2 or less health and suppressed (+3)
Rebels:
Defeat Darth Vader (+1)
Defeat Boba Fett (+1)
SPECIAL RULES:
3 caches on the board (condition tokens 1-3) (**escape pod gamemode layout and deployment, but a POI token replaces the crashed escape pod terrain piece, and there is no area explosion damage**)
At the end of round 1, flip the condition tokens over. The condition token with a 1 is replaced with a POI token (han solo in carbonite)
After round 1, reshuffle the condition tokens and put them on each of the 3 buildings. At the start of round 2, before playing command cards, flip each token. The condition token with a 1 is the empire’s assassin droid, and the condition token with a 2 is the rebel’s assassin droid. The assassin droid performs a speed-1 move from the building’s door and is added to the army’s ranks for the remainder of the game (This follows the unit card of IG-88). Randomly draw two IG command cards. You may play this card at any round in addition to your primary command card. These cards may not be used as contingencies, or have contingencies played to replace them. Treat the IG series droids as the “support” category. They are given a face up order token. They lose Bounty.
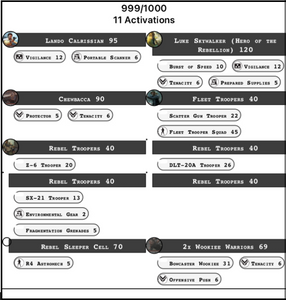
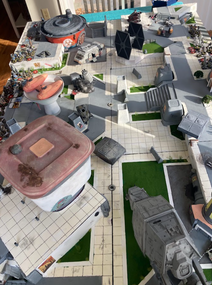
In this game, there were three different condition tokens on the map that could potentially have been the “Han Solo” objective POI. We used the old rules for the Crashed Escape Pod expansion, with a disarray-type deployment. My dad and I both deployed fairly flexibly to account for us not knowing which condition token was the true objective. I deployed Bossk and Vader along with most of my army next to the square building with Greedo Graffiti, but on the other side created a flank of my Pikes, Scout Troopers and Boba Fett. At the end of round 1, the objective was revealed to be the condition token in the middle of the board, and our IG assassin droids deployed (with his being next to all of his troopers in the orange building, and mine deploying out of the center building).

On my flanking side of the boards, I didn’t anticipate his choice of deployments very well. Round Two, my Scouts ended up getting trampled by Wookies, Fleet Troopers and Luke Skywalker. Boba Fett’s “Making His Way in the Galaxy” ended up only dealing two wounds against five of his squads, and Boba was cornered without much backup. No one was able to reach the middle objective by the end of round 2, so no points were scored.
Round 3 began with a faceoff of one-pips: “Merciless Munitions” Versus “Son of Skywalker”. I ended up winning the roll-off and using “Seize the Initiative” on Boba Fett. I used Boba’s flamethrower on the mega-squad of Fleet Troopers, and jetpacked out of trouble. Because of this, Luke had no targets for his “Son of Skywalker” turn.

On the other side of the board, Bossk threw his dioxis mine on a squad of wookiees and rebel troopers. The wookiees then charged Bossk, dealing three wounds, but were taken out by Darth Vader. By the end of Round 3, the empire had claimed the middle objective and scored 2 points.
During round 4, Boba Fett continued to make distance between himself and the oncoming army of rebels, but a squad of Rebel Sleeper Cell impressively took out a squad of stormtroopers (dealing 10 wounds to a 5 wound unit).

My IG droid managed to eliminate a squad of rebel troopers, which gave me another point. At the end of the round, my Imperial army secured the checkpoint and gained two more points.

The final round of the game came down to the command cards. The biggest play of the round was in the beginning, where I played Vader’s “Master of Evil” which suppressed a lot of his units and prevented them from being able to score. From there, the Empire came out as the winners. The game was a lot closer than the score made it sound, as he ended up killing more of my units than I had of his; however, I won due to claiming the objective earlier on and eliminating a few targets with my assassin droid. I gained the following advantage for the final game of the marathon:
At any point in the next game, play “An Entire Legion” in addition to your primary command card. Then, return “An Entire Legion” to your command card hand. You must choose “An Entire Legion” as one of your command cards.
Return of the Jedi:
The rebellion fights to eliminate the second Death’s Star’s Shield Generator, while the Empire seeks to destroy the home of the Ewoks.
ENDOR
(Destroy the Imperial Bunker/Destroy Ewok Village) Objective is the Imperial Bunker or Ewok Village
HOW TO PLAY:
Select a corp unit at the beginning of the game. They gain a bomb carrier miniature (proton charge saboteur miniature or sonic charge saboteur miniature) and may not use Scout. When attacking in melee or at range, the bomb carrier mini adds one black die. If a unit with the bomb carrier mini is defeated, they drop the bomb carrier miniature. All friendly trooper units gain Claim: bomb carrier mini. They must be in base contact with the bomb carrier mini in order to claim it.
At any point in the game, if a bomb carrier mini is in base contact with the enemy base, they can perform the action Destroy Enemy Base. Whoever destroys the enemy base first is the winner.
SPECIAL RULES:
Old long march deployment
Empire May use Major Marquand, without using Tempest Force
9 rounds maximum before game stops and scoring goes to tiebreaker
May select 3 of each command card pip number (9 total). The Empire may select Emperor Palpatine and General Veers command cards, apart from their 1 pips, even without them being in the game. When character-specific commands are being ordered with these cards, replace all orders given with “one unit”.
When a stormtrooper or no-named Ewok trooper unit is defeated, they redeploy from anywhere in their deployment zone at the end of the round. When they redeploy, they must lose 2 of their upgrade cards, if able.
Before deployment, set aside one ewok squad with an ewok trapper. That unit is treated like Cad Bane’s 3 pip. They cannot hold the bomb carrier at the start of the game.
In this game, we had to charge out a miniature bomb carrier across the board to be the first to explode our opponent’s base. I was trying to take out the center tree in the ewok village, and my dad was trying to take out the Imperial Bunker.

The game started out in my favor, with me being able to take out the “Here I am” ewok squad fairly easily and not taking any damage from the Cad Bane “Ewok Trap” bomb (we used Cad Bane’s 3-pip to represent hiding ewoks and an ewok trap). Not much firing happened in the first couple of rounds, as we were both marching our squads up towards the enemy.

As our armies approached, I hid my stormtroopers with the bomb carrier behind the radar dish. Chewbacca marched up as a mobile line-of sight blocker and managed to take out a speeder bike, but the playing field was still pretty even.

I attempted at pushing my flank and charging the bomber miniature towards their target, however Han Solo and two units of ewok slingers made short work of my squads. I used my squad of scout troopers to pick up the bomber and run even further with him, but they also got taken out. During the fight, I managed to take out the Chewbacca ATST with Major Marquand.

On the other side of the board, the rebels were pushing their flank. The ewoks charged my troopers to make sure that I wasn’t able to shoot the oncoming rebel squad containing the bomber.
I played “Give Into Your Anger” as my round 5 command card, which gave me enough time to take out the bomb-carrying rebels; however I had made a big mistake. I decided to withdraw one of my stormtroopers squads from a unit of ewoks. My thought process was that I could try and continue to run my bomber miniature and explode his base, however the stormtrooper squad was killed, and his ewok unit was free to grab their rebel bomber and continue up the board. They ended up reaching my base, but didn’t have the action to detonate the bomb, and were killed by my ATST.

Another 2-man unit of ewoks was also charging at my base, ready to claim the bomber and explode my bunker. At the end of round 7, a bunch of my stormtroopers respawned in my deployment zone and swarmed the two ewoks.

The ewoks were in trouble but received a lot of aid from Logray, who ran up to them and gave them the dodges on his “Secret Ingredients”, while also restoring a miniature using “herbal medicine”. In the end, the ewoks were able to win a key suppression roll, allowing them to move up to the bomber miniature, claim him, and blow up the imperial bunker. Because of this, the Rebels won the Battle of Endor.
Conclusion:
In the end, this was a fun set of games for “playing through the movies”. If I had another chance to do this, I would definitely do some rebalancing of the special effects and objectives (specifically making the ATAT a little weaker for Hoth and redoing the scoring system for the Tatooine game), but these matches were more for fun and the experience than being driven by competition. Because the Rebels and Empire both won two games in this series, we determined a tie-breaking game needed to be played to determine the true winner. In this “game marathon” version of the Star Wars Galaxy:
The Rebels won “A New Hope” due to sheer firepower, even with Han Solo and Chewie being killed and no one boarding the Millenium Falcon.
The Empire won the Battle of Hoth, and Chewbacca was chopped in half by Darth Vader
On Cloud City, the Empire survived a rebel onslaught in order to transport the Frozen Han Solo. Chewbacca lived in this one.
The Rebels won the Battle of Endor, but Chewie once again was killed (poor Chewbacca)














Comments